Pilgrim Hat Cookies
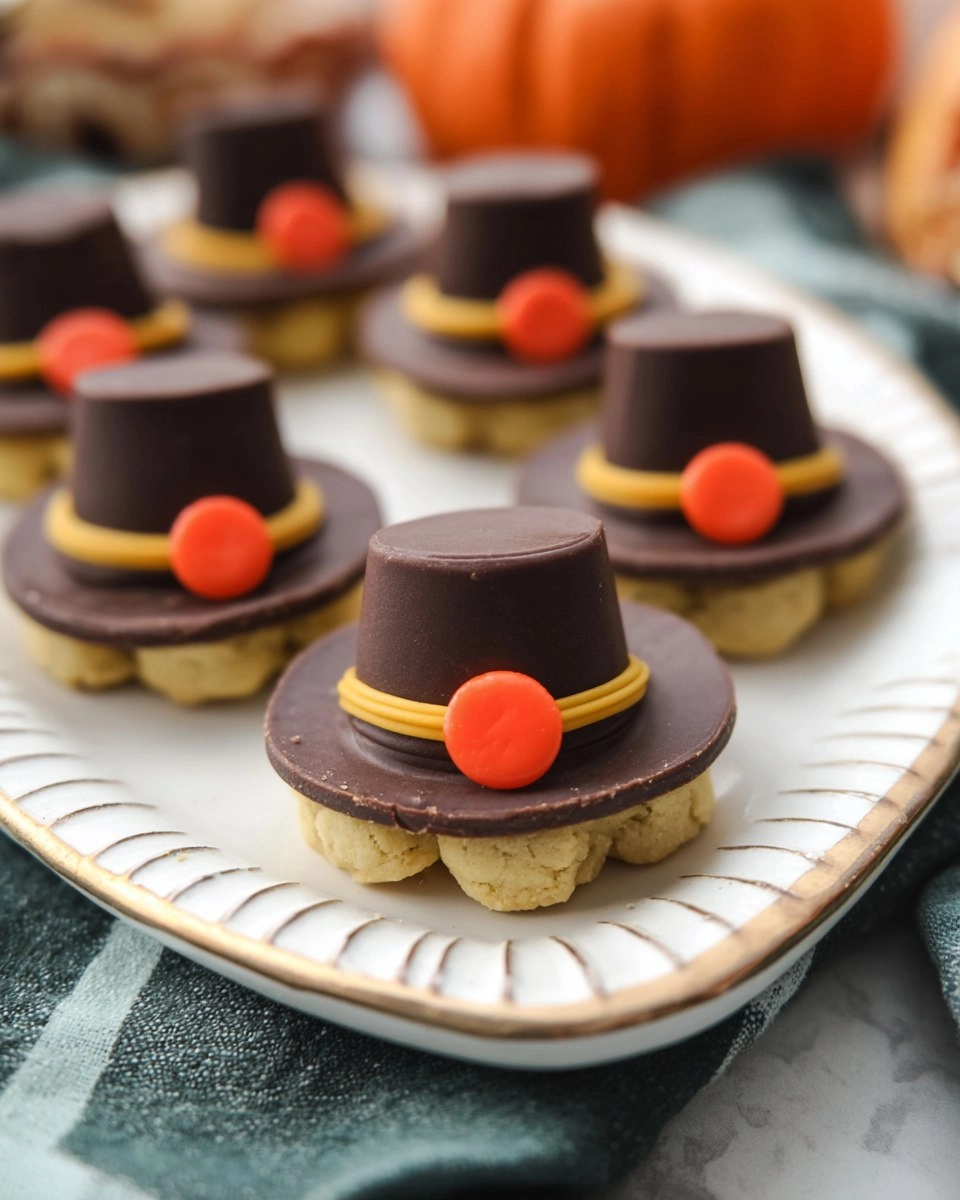
The delightful aroma of chocolate mingles with the sweet scent of caramel, instantly capturing the essence of the holiday season. Picture a gathering around the table, laughter filling the air as the bold colors of treats shine under warm lights. Among them, the Pilgrim Hat Cookies stand out like little edible masterpieces, inviting eager hands to grab a taste. These cookies are not just a feast for the eyes; their crunchy texture paired with peanut butter brings back fond memories of friendly baking sessions in the kitchen, creating scrumptious snacks together with family. As Thanksgiving approaches, what better way to celebrate than with these adorable, no-bake delights? Let’s dive into making some memorable treats this holiday season!
Table of Contents

Embodying the spirit of Thanksgiving, Pilgrim Hat Cookies are the perfect addition to any festive gathering, whether it’s a classroom treat or a family party. Getting the kids involved in creating these fun cookies only adds to the joy. Just imagine the excitement on their faces as they dab yellow icing and place the Reese’s atop the cookie base. I can hardly wait to see how many of you will try making these little hats this year!
Why You’ll Love This Recipe
- Simple & Quick: You can whip these up in just about 20 minutes, making them super easy for busy days.
- Irresistible Flavor: The combination of chocolate and peanut butter is simply divine, creating a mouthwatering treat.
- Eye-Catching Appeal: With their cute designs, these cookies are sure to be the highlight of any dessert table.
- Flexible Serving: Perfect for Thanksgiving, classroom parties, or a cozy family snack.
- Diet-Friendly Options: These can easily be enjoyed by many as they contain just 4 ingredients—all easily accessible!

Ingredients You’ll Need
- 12 Fudge Stripe Cookies: These provide the sturdy base and cute shape for our hats. Look for the ones with the thick, chocolatey stripes for a more delicious payoff.
- 1 tube Yellow Cookie Icing: This adds the charm and color necessary for the buckle of the pilgrim hat. You can substitute with homemade icing if you prefer.
- 12 Reese’s, Unwrapped: The classic peanut butter cups bring both taste and a delightful height to your cookies. If you’re allergic to nuts, chocolate-covered caramel candies work as a great alternative.
- 12 Orange Reese’s Pieces: These little candies serve as the bright, festive buckles that complete our hats, adding crunch and color. If you can’t find them, feel free to use any orange candy that fits the bill!
How to Make Pilgrim Hat Cookies
Prepare Your Workstation: Start by laying out a piece of parchment paper on your kitchen counter. This will be the workspace for your **Pilgrim Hat Cookies**. Place 12 Fudge Stripe Cookies down with the striped side facing down. This gives you a solid base to build your hat!
Pipe the Icing: With your yellow cookie icing tube, squeeze out circles onto the center of each cookie. Make sure these circles are slightly larger than the widest part of the unwrapped Reese’s. This will act as the icing “glue” that holds our hats together, so take your time to get it right!
Attach the Reese’s: Once you’ve piped the icing, carefully pick up each unwrapped Reese’s and gently press it into the center of the yellow icing. Make sure it’s settled in nicely—you want those hats to stay standing tall!
Create the Buckles: For the final touch, dab a bit of yellow icing on the back of an orange Reese’s Pieces and stick it onto the front of the Reese’s. This little candy acts as the buckle on the pilgrim hat. Repeat this for all your cookies, and just like that, you have the sweetest little hats ready to shine!
Storing & Reheating
To keep your Pilgrim Hat Cookies fresh, store them at room temperature in an airtight container for up to 3 days. If you need them to last longer, refrigeration is a great option, but it’s best to consume them within a week. For freezing, place them in a freezer-safe container, and they can last up to 3 months. Just remember to let them come to room temperature before enjoying, as texture may shift a bit after freezing, but a few minutes at room temperature should refresh them perfectly.
Chef’s Helpful Tips
- Mind the Icing: If the icing is too stiff, place it in a warm area for a few minutes to soften.
- Avoid Sogginess: Prevent the cookies from getting soggy by not keeping them in the fridge too long or exposing them to moisture.
- Timing is Key: Try to serve them fresh on the same day, hands down the best way to eat them!
- Fun Variations: Think about color by using dark chocolate cookies for the base or adding sprinkles for extra flair.
- Customize Your Buckles: Feel free to get creative with different candy for the buckles to make your treats unique!
The charm of Pilgrim Hat Cookies lies not just in how they look, but in how bringing people together can create joy. Their simple construction allows for a little creativity while adding a dash of holiday cheer. Encouraging you to play around with your favorites while making them is what kitchens are all about. Enjoy each bite and share those delicious moments with family and friends. Get your ingredients ready, and let’s make some sweet memories together!
Recipe FAQs
Can I use homemade icing instead of pre-packaged?
Absolutely! You can make your own icing using powdered sugar and water or milk. Just ensure it’s thick enough to hold the Reese’s in place. Customize it with colors if you’d like, too!
How can I make these cookies gluten-free?
For a gluten-free option, substitute regular Fudge Stripe Cookies with gluten-free cookies. Make sure to double check the ingredient labels of any candy you’re using for possible gluten traces.
How long do these cookies last?
When stored properly in an airtight container, Pilgrim Hat Cookies can last up to 3 days at room temperature. In the fridge, they can last about a week, but they taste best when fresh!
Can I use other types of candy for decoration?
Certainly! You can get creative with different candies for the buckle or even shape your own using fondant or modeling chocolate to add a personal touch.
More Desserts & Appetizers Recipes
- Buffalo Chicken Wings
- Lemon Cake
- Classic Chocolate Chess Pie
- Chocolate Dipped Strawberries
- Hot Chocolate Rice Krispie Treats
Did You Enjoy Making This Recipe? Please rate this recipe with ⭐⭐⭐⭐⭐ or leave a comment.
📖 Recipe Card

Pilgrim Hat Cookies
- Prep Time: 20 minutes
- Cook Time: 0 minutes
- Total Time: 20 minutes
- Yield: 12 cookies 1x
- Category: Dessert
- Method: No-Bake
- Cuisine: American
Description
These fun and delicious Pilgrim Hat Cookies blend chocolate and peanut butter for a delightful holiday treat. Perfect for family gatherings or classroom parties, their irresistible flavor and easy prep make them ideal for anyone craving homemade sweets. Get ready to make lasting memories in the kitchen!
Ingredients
- 12 Fudge Stripe Cookies
- 1 tube Yellow Cookie Icing
- 12 Reese's, Unwrapped
- 12 Orange Reese's Pieces
Instructions
- Prepare Your Workstation: Lay down parchment paper and place Fudge Stripe Cookies striped side down.
- Pipe the Icing: Squeeze yellow icing onto the center of each cookie.
- Attach the Reese's: Press each unwrapped Reese's into the yellow icing.
- Create the Buckles: Stick orange Reese's Pieces onto the front of the Reese's as buckles.
Notes
Store at room temperature in an airtight container for up to 3 days.
Use gluten-free cookies for a gluten-free option.
Try dark chocolate cookies for a fun variation.
Nutrition
- Serving Size: 1 cookie
- Calories: 120
- Sugar: 8g
- Sodium: 50mg
- Fat: 6g
- Saturated Fat: 3g
- Unsaturated Fat: 2g
- Trans Fat: 0g
- Carbohydrates: 15g
- Fiber: 0g
- Protein: 2g
- Cholesterol: 5mg

